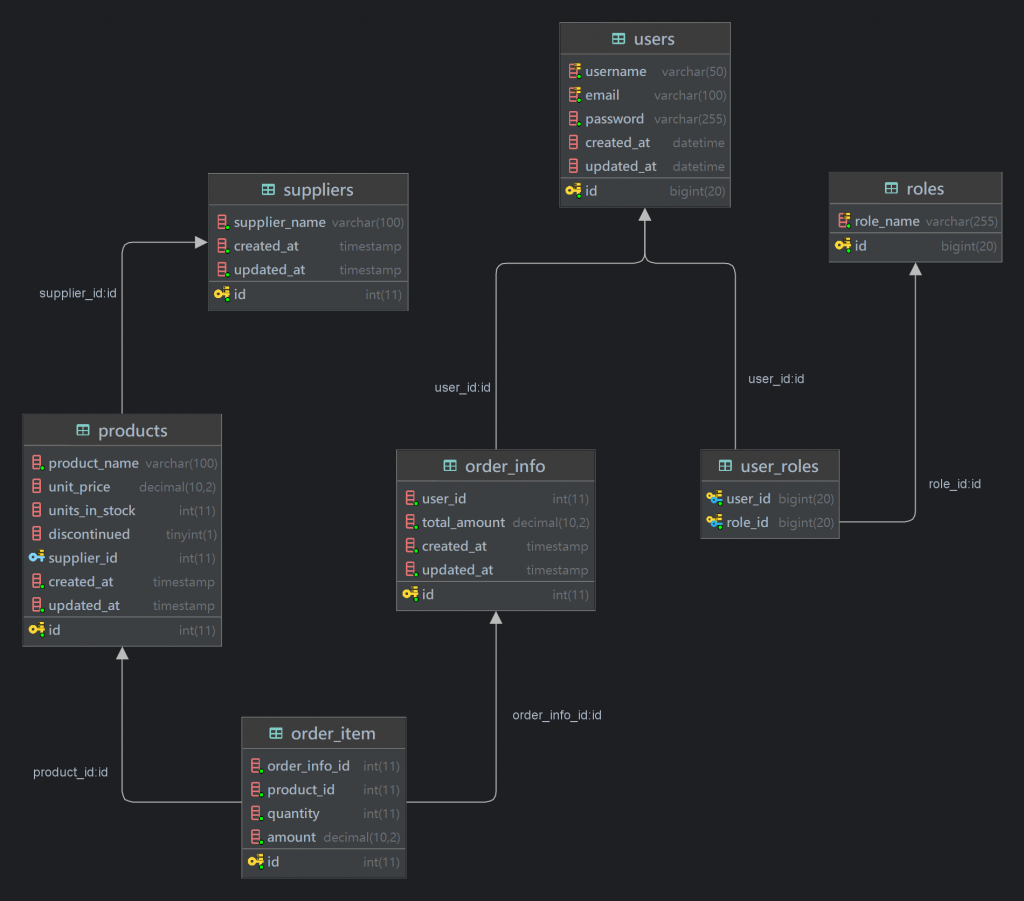
這篇繼續擴充訂單功能,可以回顧一下先前畫的架構圖,我們要有一張中間的表來記錄購物車內有哪些商品資訊,這部分建立訂單可以想像完成選擇要購買的商品之後送出訂單所產生的資料紀錄。
訂單功能建立 order_info 訂單資訊,用來記錄我們整筆訂單的彙整資訊,包含關聯哪位 user, 總金額多少
order_item 訂單項目資訊,用來記錄整筆訂單中各別項目關聯哪個 product (product_id)、購買數量是多少(quantity)、價錢(amount),從中也可以知道屬於哪筆訂單(order_info_id)。
基本資料建立 1 2 3 4 5 6 7 8 9 10 11 12 13 14 15 16 17 CREATE TABLE order_info( id INT NOT NULL PRIMARY KEY AUTO_INCREMENT, user_id INT NOT NULL , total_amount DECIMAL (10 , 2 ) NOT NULL , created_at TIMESTAMP DEFAULT CURRENT_TIMESTAMP , updated_at TIMESTAMP DEFAULT CURRENT_TIMESTAMP ON UPDATE CURRENT_TIMESTAMP ); CREATE TABLE order_item( id INT NOT NULL PRIMARY KEY AUTO_INCREMENT, order_info_id INT NOT NULL , product_id INT NOT NULL , quantity INT NOT NULL , amount DECIMAL (10 , 2 ) NOT NULL );
Entity
1 2 3 4 5 6 7 8 9 10 11 12 13 14 15 16 17 18 19 20 21 22 @Entity @Data @Table(name = "order_info") public class OrderInfo extends BaseEntity { private Integer userId; private Double totalAmount; } @Entity @Data @Table(name = "order_item") public class OrderItem { @Id @GeneratedValue(strategy = GenerationType.IDENTITY) private Integer id; private Integer orderInfoId; private Integer productId; private Integer quantity; private Double amount; }
DTO (CreateOrderInfoRequest.class, CreateOrderResponse.class)
1 2 3 4 5 6 7 8 9 10 11 12 13 14 @Data public class CreateOrderInfoRequest { @NotEmpty private List<BuyItem> buyItemList; } @Data public class CreateOrderResponse { private OrderInfo orderInfo; private List<HashMap<String, Object>> orderItemList; }
新增訂單 當勾選好要哪些商品要送出訂單時就會呼叫這隻 API 建立訂單
Controller
1 2 3 4 5 6 7 8 9 10 11 12 13 14 15 16 17 18 19 20 21 22 23 @RestController @RequestMapping("/api") public class OrderInfoController { private static final Logger log = LoggerFactory.getLogger(OrderInfoController.class); @Autowired private OrderService orderService; @Autowired private UserService userService; @PostMapping("/users/{userId}/orders") public ResponseEntity<?> createOrder(@PathVariable Integer userId, @RequestBody @Valid CreateOrderInfoRequest createOrderInfoRequest) { Optional<User> user = userService.getUserByID(userId); if (!user.isPresent()) { log.warn("UserId: {} is not found" , userId); throw new ResponseStatusException (HttpStatus.BAD_REQUEST); } CreateOrderResponse createOrderResponse = orderService.createOrder(userId, createOrderInfoRequest); return ResponseEntity.status(HttpStatus.CREATED).body(createOrderResponse); } }
Service
這邊 createOrder 的運作流程:
取出訂單內各項商品,確認庫存
計算總價錢
扣庫存
建立訂單 orderInfo
orderItem 建立組裝 Response ())
組裝 Response (CreateOrderResponse)
1 2 3 4 5 6 7 8 9 10 11 12 13 14 15 16 17 18 19 20 21 22 23 24 25 26 27 28 29 30 31 32 33 34 35 36 37 38 39 40 41 42 43 44 45 46 47 48 49 50 51 52 53 54 55 56 57 58 59 60 61 62 63 64 65 66 67 68 69 70 71 72 73 74 75 76 77 78 79 80 @Service public class OrderService { private static final Logger log = LoggerFactory.getLogger(OrderService.class); @Autowired private OrderInfoDao orderInfoDao; @Autowired private OrderItemDao orderItemDao; @Autowired private ProductDao productDao; @Transactional public CreateOrderResponse createOrder (Integer userId, CreateOrderInfoRequest createOrderInfoRequest) { Double totalAmount = 0.0 ; List<OrderItem> orderItemList = new ArrayList <>(); for (BuyItem buyItem : createOrderInfoRequest.getBuyItemList()) { Product product = productDao.findById(buyItem.getProductId()) .orElseThrow(() -> { log.warn("productId: {} not found" , buyItem.getProductId()); throw new ResponseStatusException (HttpStatus.BAD_REQUEST); }); if (product.getUnitsInStock() < buyItem.getQuantity()) { log.warn("productId: {} stock is not enough, remaining stock is {}, requested quantity is {}" , buyItem.getProductId(), product.getUnitsInStock(), buyItem.getQuantity()); throw new ResponseStatusException (HttpStatus.BAD_REQUEST); } double amount = (buyItem.getQuantity() * product.getUnitPrice()); totalAmount += amount; OrderItem orderItem = new OrderItem (); orderItem.setProductId(buyItem.getProductId()); orderItem.setQuantity(buyItem.getQuantity()); orderItem.setAmount(amount); int updateStock = product.getUnitsInStock() - orderItem.getQuantity(); product.setUnitsInStock(updateStock); productDao.save(product); orderItemList.add(orderItem); } OrderInfo orderInfo = new OrderInfo (); orderInfo.setUserId(userId); orderInfo.setTotalAmount(totalAmount); OrderInfo orderInfoSaved = orderInfoDao.save(orderInfo); int orderInfoId = orderInfoSaved.getId(); orderItemList.forEach(item -> item.setOrderInfoId(orderInfoId)); orderItemDao.saveAll(orderItemList); List<HashMap<String, Object>> responseOrderItemList = new ArrayList <>(); for (OrderItem orderItem : orderItemList) { HashMap<String, Object> map = new HashMap <>(); Product product = productDao.findById(orderItem.getProductId()).get(); map.put("orderItemId" , orderItem.getId()); map.put("orderInfoId" , orderItem.getOrderInfoId()); map.put("productId" , orderItem.getProductId()); map.put("quantity" , orderItem.getQuantity()); map.put("amount" , orderItem.getAmount()); map.put("productName" , product.getProductName()); responseOrderItemList.add(map); } CreateOrderResponse createOrderResponse = new CreateOrderResponse (); createOrderResponse.setOrderInfo(orderInfoSaved); createOrderResponse.setOrderItemList(responseOrderItemList); return createOrderResponse; } }
dao
1 2 3 4 5 public interface OrderInfoDao extends JpaRepository <OrderInfo, Integer> {} public interface OrderItemDao extends JpaRepository <OrderItem, Integer> {}
權限建立 這邊希望可以針對特定路徑 (/api/users/{userId}/orders )去判斷,只有自己能夠建立自己訂單如果創建訂單 userId 沒有對應路徑上的 userId 就會不給與權限。
針對 SecurityConfig 設置,有特別的寫法可以讓進行請求時進入特定方法來驗證,這邊加上一個 checkUserIdAndRole 方法,裡面用到 Authentication 物件來確認登入者資訊,因為登入取得 JWT 後,這些資訊就會存入 Security Context ,讓你可以取出來進行驗證。
我這邊有特別開放讓 Admin 可以不受限制建立所有路徑下的訂單,主要是要設計讓 ROLE_BUYER 才可以針對自己路徑的訂單建立,符合 Restful 的風格。
1 2 3 4 5 6 7 8 9 10 11 12 13 14 15 16 17 18 19 20 21 22 23 24 25 26 27 28 29 30 31 32 33 34 35 36 @Bean public SecurityFilterChain filterChain (HttpSecurity httpSecurity) throws Exception { return httpSecurity .csrf(customizer -> customizer.disable()) .authorizeHttpRequests((registry) -> registry .requestMatchers(HttpMethod.POST, "/register" , "/login" ).permitAll() .requestMatchers(HttpMethod.GET, "/error" , "/api/products/**" ).permitAll() .requestMatchers(HttpMethod.GET, "/checkAuthentication" ).hasAnyAuthority("ROLE_BUYER" , "ROLE_SELLER" , "ROLE_ADMIN" ) .requestMatchers(HttpMethod.POST, "/api/products" ).hasAuthority("ROLE_SELLER" ) .requestMatchers(HttpMethod.DELETE, "/api/products" ).hasAuthority("ROLE_SELLER" ) .requestMatchers("/api/users/*" ).hasAuthority("ROLE_ADMIN" ) .requestMatchers(HttpMethod.POST, "/api/users/{userId}/orders" ).access(this ::checkUserIdAndRole) .anyRequest().authenticated() ) .sessionManagement(session -> session.sessionCreationPolicy(SessionCreationPolicy.STATELESS)) .addFilterBefore(jwtFilter, UsernamePasswordAuthenticationFilter.class) .build(); } private AuthorizationDecision checkUserIdAndRole (Supplier<Authentication> authentication, RequestAuthorizationContext context) { int userId = Integer.parseInt(context.getVariables().get("userId" )); Authentication auth = authentication.get(); if (!(auth.getPrincipal() instanceof UserPrincipal userPrincipal)) { return new AuthorizationDecision (false ); } boolean hasAccess = auth.getAuthorities().stream() .anyMatch(a -> a.getAuthority().equals("ROLE_ADMIN" )) || (auth.getAuthorities().stream().anyMatch(a -> a.getAuthority().equals("ROLE_BUYER" )) && userPrincipal.getId().equals(userId)); log.info("checkUserIdAndRole access permit: {}" , hasAccess); return new AuthorizationDecision (hasAccess); }
以上大致就完成建立訂單的創建跟權限設定。
進行測試 1 2 3 4 5 6 7 8 9 10 11 12 { "buyItemList" : [ { "productId" : 1 , "quantity" : 1 } , { "productId" : 2 , "quantity" : 1 } ] }
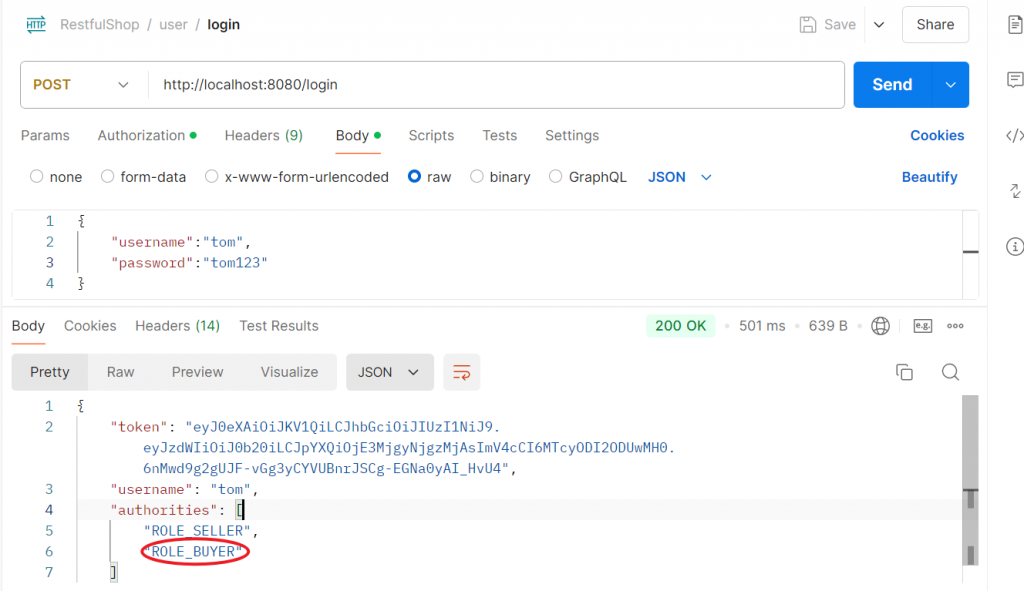
確定 buyer 可以創建 Order_Info,這邊使用 userId = 2 的使用者測試,先登入
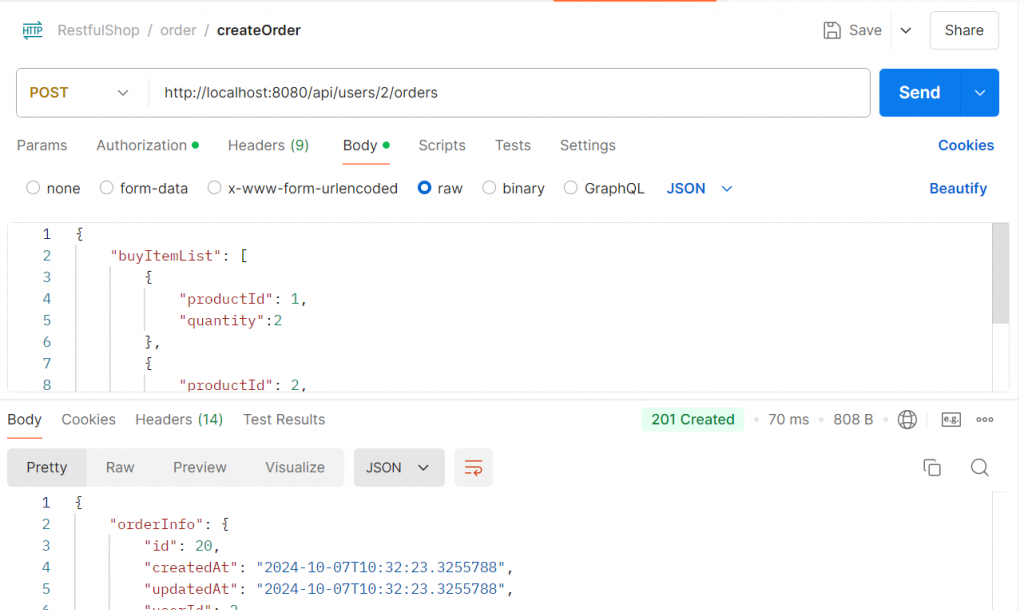
對應其 id = 2 路徑就可以創建
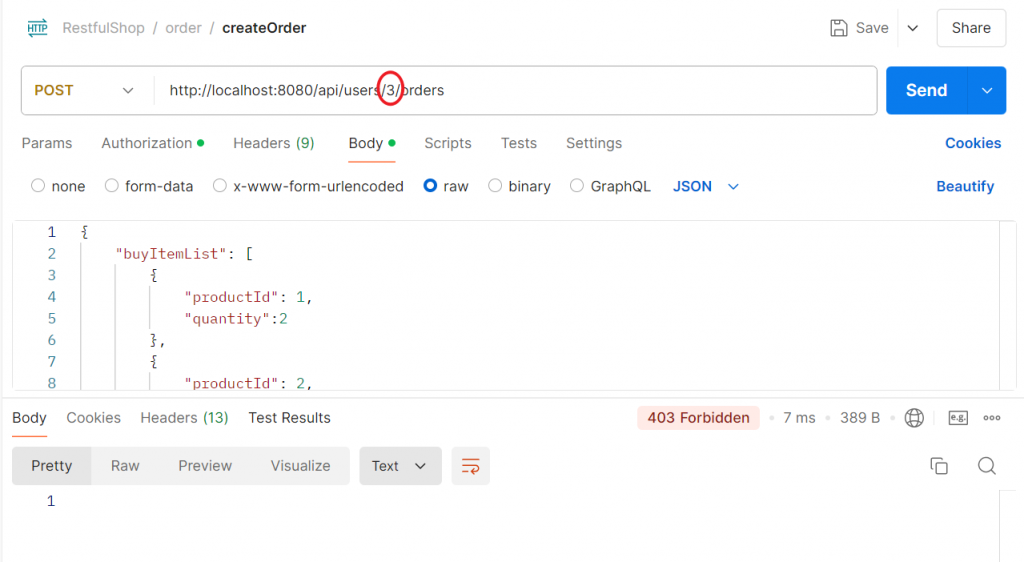
如果用其他 id 路徑就會被禁止
以上大概是這次介紹這些電商的一些功能設計,還有加入 Security 權限控管的一些實作,實際上還有很多東西都可以細部去設計,這邊提供一些實務上的應用給大家參考。
下一篇就簡單寫一些測試也應用到之前的介紹,讓大家可以比較了解應用 Spring Boot 實務的開發部分。