JWT
JSON Web Token (JWT),是一種根據將 JSON 格式資料進行編碼的的開放標準(RFC 7519),用於雙方之間安全將訊息作為 JSON 物件進行傳輸,訊息是經過數位簽章 (Digital Signature) 加密,因此可以被驗證及信任。
目前也成為各大網站之間進行資源獲取時所採用證明身份的訊息格式。
為什麼要用?
- 授權 (Authorization):先前提過,授權就是指根據使用者身分給予特定的瀏覽或是存取權限,這也是 JWT 常用的情境,例如使用者登入後,點選特定的功能或區域,發送請求時,需夾帶 JWT,Server 端就可根據該 JWT 所帶的資訊驗證是否可以開放使用該功能。像是單一路口登錄 (Single Sign On) 實作上也是廣泛應用到 JWT 。
- 訊息交換 (Information Exchange):JWT 可以透過公鑰/私鑰來做簽章,讓我們可知道是誰發送這個 JWT,此外,由於簽章是使用 header 和 payload 計算的,因此可驗證內容是否遭到篡改。
JWT 結構
可以透過這個網站來測試產生的 jwt 解開後的內容
https://jwt.io/
Head
標頭來顯示使用演算法及 token 類型
- alg: token 被加密的演算法,如HMAC、SHA256、RSA
- typ:token 類型,基本上都是 JWT
1
2
3
4
| {
"alg": "HS256",
"typ": "JWT"
}
|
Payload
放入要攜帶的資訊或聲明 (claims) 的內容。
通常有 sub, iat, exp 這些資訊。這邊補充後面導入 JWT 套件可以設定的資訊大寫名稱,等號後面也有指出對應的 jwt 內代表名稱
- ISSUER = “iss” 簽發者
- SUBJECT = “sub” 主旨,通常作為識別主要內容 (username)
- AUDIENCE = “aud” 接收方
- EXPIRATION = “exp” 到期時間,需大於簽發時間
- NOT_BEFORE = “nbf” 定義某個時間前不可使用
- ISSUED_AT = “iat” 簽發時間
- ID = “jti” 識別身分不重複 id
1
2
3
4
5
| {
"sub": "sean",
"iat": 1725950094,
"exp": 1725950274
}
|
Signature
簽章會是根據 Header 和 Payload 分別都用 base64UrlEncode ,再加上密鑰 (secret) 進行雜湊演算,產生一組不可反解的亂數,當成簽章,用來驗證 JWT 是否經過篡改。
特別注意 Header, Payload 會經過 Base64 編碼的處理。是可以被還原請不要放敏感資訊。
導入前準備
pom 導入目前 jjwt 新板 0.12.6
https://github.com/jwtk/jjwt
1
2
3
4
5
6
7
8
9
10
11
12
13
14
15
16
17
| <dependency>
<groupId>io.jsonwebtoken</groupId>
<artifactId>jjwt-api</artifactId>
<version>0.12.6</version>
</dependency>
<dependency>
<groupId>io.jsonwebtoken</groupId>
<artifactId>jjwt-impl</artifactId>
<version>0.12.6</version>
<scope>runtime</scope>
</dependency>
<dependency>
<groupId>io.jsonwebtoken</groupId>
<artifactId>jjwt-jackson</artifactId>
<version>0.12.6</version>
<scope>runtime</scope>
</dependency>
|
登入驗證
導入相關參數至 application.properties
1
2
3
4
|
jwt.secret-key= {yourKey}
jwt.valid-seconds=60
|
JwtService
我們將實際要產生 token 和驗證的方法放入 JwtService。
這邊提供兩種產生鑰匙的方式,可以透過 application.properties 環境參數帶入,但我測試時使用幾次如果自己隨便輸入可能會因為格式不符就會被認定不安全,所以另外提供 KeyGenerator 來協助產生的方法,寫在 generateSecretKey(),再由 getKey() 將密鑰類型從 String 轉成 Key ,這樣每次程式重新啟動都會產生一組密鑰,這邊也會印在 console 可以拿來回頭到前面提供的網站確認是否可以成功驗證。
1
2
3
4
5
6
7
8
9
10
11
12
13
14
15
16
17
18
19
20
21
22
23
24
25
26
27
28
29
30
| @Service
public class JwtService {
@Value("${jwt.secret-key}")
private String JWT_SECRET_KEY_STR;
@Value("${jwt.valid-seconds}")
private int EXPIRATION_TIME;
private String secretKey;
public JwtService() {
secretKey = generateSecretKey();
}
public String generateSecretKey() {
try {
KeyGenerator keyGen = KeyGenerator.getInstance("HmacSHA256");
SecretKey secretKey = keyGen.generateKey();
System.out.println("Secret Key : " + secretKey.toString());
return Base64.getEncoder().encodeToString(secretKey.getEncoded());
} catch (NoSuchAlgorithmException e) {
throw new RuntimeException("Error generating secret key", e);
}
}
public Key getKey() {
byte[] keyBytes = Decoders.BASE64.decode(secretKey);
return Keys.hmacShaKeyFor(keyBytes);
}
}
|
產生 Token
使用 jjwt 套件提供的產生 token 方法來進行設置,把使用名稱 setSubject 設到 sub、有效時間 setExpiration 設到 exp,還有帶入上面取得的 key
1
2
3
4
5
6
7
8
9
10
11
| public String generateToken(Authentication authentication) {
Map<String, Object> claims = new HashMap<>();
return Jwts.builder()
.setClaims(claims)
.setHeaderParam("typ", "JWT")
.setSubject(authentication.getName())
.setIssuedAt(new Date(System.currentTimeMillis()))
.setExpiration(new Date(System.currentTimeMillis() + 1000 * EXPIRATION_TIME * 3))
.signWith(getKey(), SignatureAlgorithm.HS256).compact();
}
|
寫個 controller 測試一下
這邊有多加入一個 Security 內提供的驗證,透過 AuthenticationManager 來產生 Authentication 物件協助驗證。
先回到 SecurityConfig 註冊 AuthenticationManager 的 Bean
1
2
3
4
5
6
7
8
9
10
| @EnableWebSecurity
@Configuration
public class SecurityConfig {
@Bean
public AuthenticationManager authenticationManager(AuthenticationConfiguration config) throws Exception {
return config.getAuthenticationManager();
}
}
|
引入 Controller 使用,只要我們傳遞 UsernamePasswordAuthenticationToken 這個物件,參數把 username, password 給他就可以回傳給我們 Authentication,裡面會包含是否通過帳號密碼驗證還有使用者相關的資訊 (UserDetails, Authorities…),我們可透過取得裡面的 authenticated 判斷是否有通過,這物件也提供 isAuthenticated() 方法來判斷。
1
2
3
4
5
6
7
8
9
10
11
12
13
14
15
16
17
18
19
20
21
22
23
24
25
26
27
28
29
| @RestController
public class UserController {
@Autowired
private UserService userService;
@Autowired
private AuthenticationManager authenticationManager;
@Autowired
private JwtService jwtService;
@Autowired
private MyUserDetailsService userDetailsService;
@PostMapping("/login")
public String login(@RequestBody UserLoginRequest userRequest) throws Exception {
Authentication authentication = authenticationManager
.authenticate(new UsernamePasswordAuthenticationToken(userRequest.getUsername(), userRequest.getPassword()));
if (authentication.isAuthenticated()) {
String jwtToken = jwtService.generateToken(authentication);
return jwtToken;
} else {
return "Login failed";
}
}
}
|
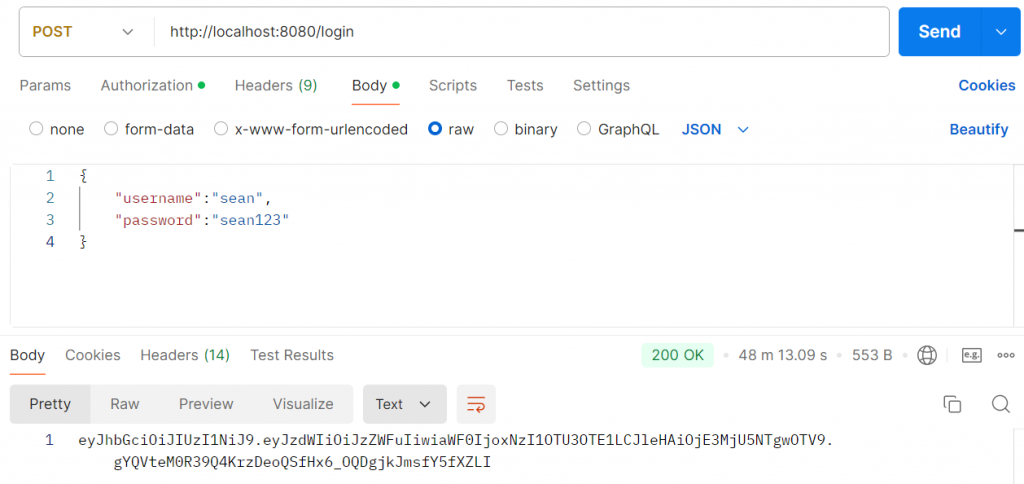
成功就可以看到回傳的 JWT
參考資料: